
We’ve been approached by our customers a few times for a short introduction to the live chat operator console. Although we have all the feature descriptions and “how to” instructions in our user manual, sometimes it is useful to have a short getting started guide to quickly introduce new team members to the application.
The most common feedback we received from our clients was that the chat application interface is quite intuitive and easy to navigate, so in this article we will not be describing all the console features in detail. In this post we would like to present a short guide describing the most useful operator console features on which our support team received the most inquiries and which appeared to be less intuitive to our clients.
Getting started as a live chat support operator
1. Transferring calls between operators
There are 2 ways to access the call transfer option in the chat application. For both of them first you will need to open the Operators tab in the console.
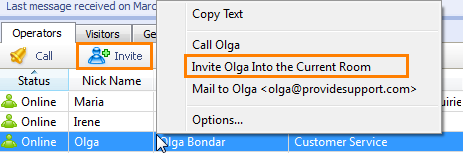 a) You can click in the row of the operator to whom you would like to transfer the call and then click the button “Invite”, which is located in the toolbar right above the operator list.
If the toolbar is not visible in your console, you can enable it through the console menu Tools/ Options/ Operators -> “Show Tool Bar”.
b) You can right-click in the row of the operator to whom you would like to transfer the call and select the option “Invite Operator [Operator’s Name] into the Current Room”
After this both operators will appear in the chat room and both will be visible to the customer. The customer will see the picture of the invited operator in the chat messenger. The first operator who wanted to transfer the call can close the chat room, leaving the second operator to continue the chat.
2. Locating visitors’ details in the console
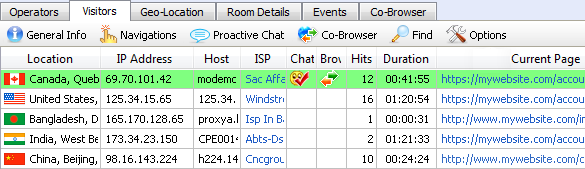
If you would like to see the visitors’ details, such as their location, IP address, the operating system and the browser they use, how much time they spent on your website, the pages they visited etc., all this information can be viewed from the Visitors tab of the operator console.
If you open this tab and don’t see any information, it means that you have placed a direct link to chat on your website. Direct links don’t support the visitor tracking feature. If you would like to enable visitor monitoring, you need to add one of our script codes, such as Recommended Graphics Chat Button Code, to your website pages.
Additionally to the information available through the visitor’s browser, you can pass additional details, such as membership details, from your website to the operator console. Detailed instructions on how to do that you can find in our other post on using Passing Info Code.
3. Changing the operator status from “online” to “away” and “offline”
Going offline with the console is easy. You can access this option from the top menu File and click “Exit”, or “Log Out” if you would like to connect with a different profile.
The “away” status is useful when the operator would like to step away from the console for a few minutes, but would like to stay connected, or if one has many chats and would like to finish them before accepting new ones.
In the “away” mode the operator will not receive any new incoming chat requests, but will be able to continue existing chats. In other words, the away status makes the operator invisible to all new callers, and if there are no other online operators to whom new calls can be assigned, the chat account will go offline and the chat button on the website will also switch to “offline.”
There are 3 ways to switch to “away” mode manually:
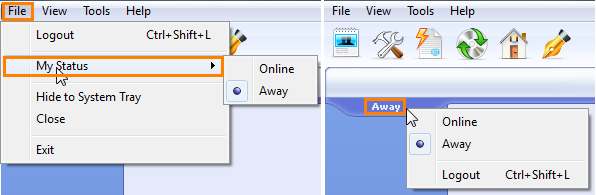
- from the console menu File/ My Status -> Away
- from the small status button right below the menu toolbar at the top left of the operator console
- by using a shortcut Ctrl+Shift+S which allows switching between online and away modes.
There are also options to automatically change the console status to “away” when the operator has been inactive for a certain period of time, when the screensaver is activated, or when the computer is locked. These options can be accessed from the console menu Tools/ Options/ General -> My Status section.
We’ve been asked a few times if it is possible to set up online and offline hours for the operator console so that it automatically goes online/offline at specified times. Unfortunately, such a feature is not available in our application. The operator needs to manually switch their status when they would like to connect online or disconnect.
4. Where to find the information the customer fills out on the Start Chat Form
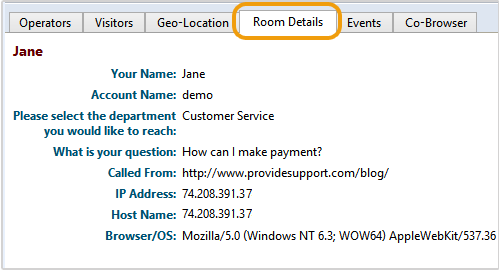
If you are asking the customer to provide additional details, such as their email, phone or any other details, you can review this information in the Room Details tab of the chat console even before accepting the chat. The information will be visible there for the whole duration of the chat session. After the chat has been ended, these details will appear in the Visitor Details section at the bottom of the chat transcript.
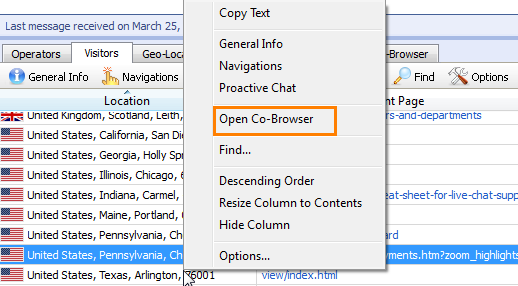
5. What is Co-Browser and how to navigate customers between the website pages
Co-browser is a tool which allows the operator to see the webpage the customer is viewing at the moment. It does not allow seeing the customer’s desktop though.
Co-browser works in two modes:
a) Follow mode allows you to see the current page of any customer who is staying on your website at the moment. As the customer is switching between the pages, you will also see a new page that the customer has navigated to.
b) Proactive Navigation mode allows you to navigate the customer to another page of your website. This action can be performed only with customers who started a chat with you. If the customer is staying on your website but not in a chat room with you, proactive navigation mode is disabled.
To start the co-browser, you need to locate the visitor’s information in the Visitors tab of the operator console, right-click in the visitor’s row and select the option “Open Co-Browser”. The Co-Browser tab will open. If you would like to navigate the customer to another page of the website, you can click any link/button on the webpage that you see in the co-browser screen and the customer will be redirected to that page. In the Follow mode redirection will not happen, you will only see the page the customer is staying at and a new page if the client switches to another page.
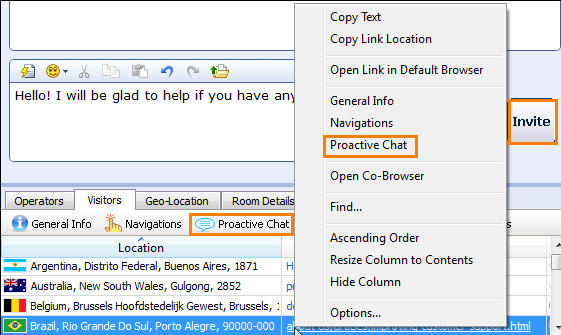
6. Proactive Chat, or how to send chat invitations to customers
To send a chat invitation to a customer, you need to locate the row with his details in the Visitors tab of the operator console, and either right-click and select “Proactive Chat” from the context menu, or click the Proactive Chat button which is located in the toolbar right above the list of visitors. A new chat room will open. You will need to type a chat invitation greeting in the text input field and click “Invite”.
Proactive chat can be sent to any visitor of your website, however, the feature is not automated, so the invitation will not pop up on the visitor screen unless the operator manually initiates it.
7. Geo-Location map
Geo-location tool shows geographic distribution of the current visitors to your website on the map. To view it, you just need to open Geo-Location tab in your operator console.
Different categories of customers are represented by different symbols, description on which you can find in the map’s legend in the bottom left corner of the map. Currently there is no zooming option to zoom in to the customer’s exact location.
8. Setting up Canned Responses
If you just started a new account, no canned responses are available in the operator console by default. They need to be set up by the operator or account manager.
Canned responses can be added to the account only from the administrator panel on our website at www.providesupport.com. There you need to click My Account tab and navigate to Canned Responses screen from the menu bar on the left.
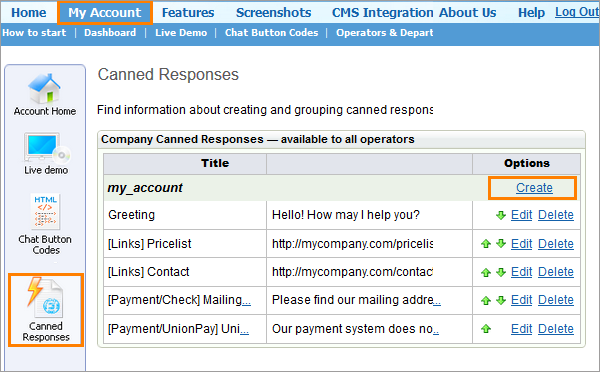
Once canned responses are set up there, the operator will be able to select them from the Canned Responses menu in the chat console.
Canned responses can be added individually for each operator, or they can be set up for the whole account so that all operators have access to them. You can read more detailed instructions on this setting in our user manual article.
9. Profile Manager, or how to operate several accounts from the same operator console
 If you have several live chat accounts or there are several operator profiles in your account and they are all managed by one operator, it is possible to set up the operator console so that all profiles are opened from it automatically.
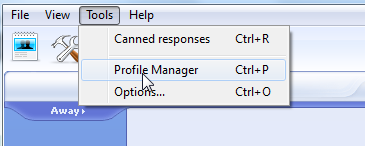
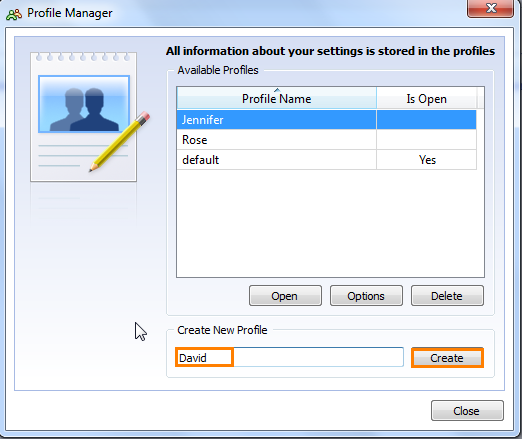
To accomplish this, you need to click Tools / Profile Manager from the operator console menu at the top right and in the Profile Manager screen enter the name of your other account/operator profile and click “Create”.
Once you add all your accounts / operator profiles in this way, you can click on any of them to select this profile and then click either “Open” to open this profile manually or click “Options” to change the settings for this profile.
If you would like your second account/profile to open and log in automatically, you need to click “Options”, open the General tab and check the boxes “Open profile [Profile_Name] when Operator Console starts” and “Automatically login when Main Window is opening”.
After this, whenever you start your operator console, all profiles will be opened automatically. There will be a separate console instance for each of the profiles.
10. Changing event notifications and sound alerts
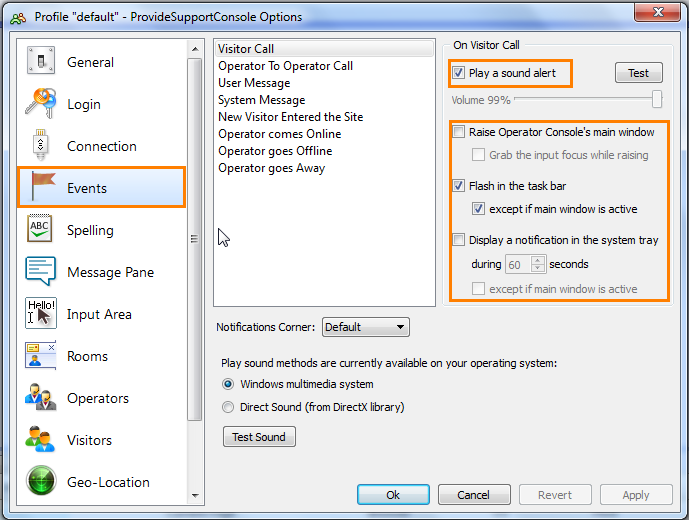
For each system event, such as new visitor call, visitor message, system message, new visitor entering the website etc., you can get 3 types of alerts: sound alert, visual alert when the operator console will either raise and steal the screen focus or flash in the taskbar, and system tray notifications. All these alerts can be enabled/disabled from the operator console menu Tools/ Options/ Events [Events tab was renamed into Notifications tab in the operator console starting from version 5.8.1].
Our support team was approached a few times with the question how to change the default ringtone for audio alerts. Unfortunately, the operator console offers only one ringtone option, and it is not possible to change it through the console interface. However, default sound files can be replaced with custom ones in the system folder at Drive C:\ Program Files\ Provide Support\ Live Support Chat for Website\ Sound (this is a default location for the installation of the console files).
You will see the following files in that folder.
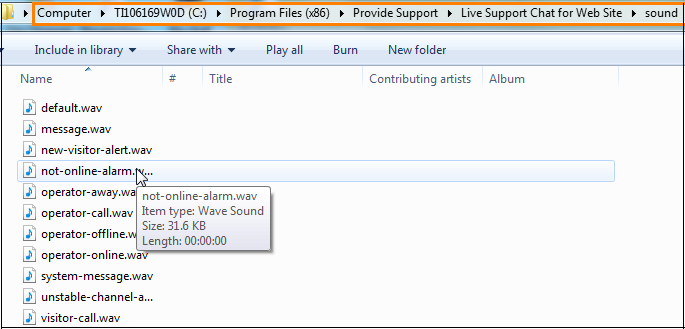
If you would like to set up your own ringtone, you can replace the default .wav file with your own keeping the name of the file so that the chat console can recognize and play it at the appropriate event.
This was a quick introduction to the major chat console features. If you are experiencing any problems with the application, you can send an error report to our tech support team using the console menu option “Help -> Send Error Report to Provide Support”. You can also contact our chat support directly by clicking the chat button on our website at any time convenient to you. We will be glad to help with any questions.
- How Not to Lose Customers in the Busy Holiday Season - December 6, 2018
- The Goals to Set For Your Customer Service Team - October 4, 2018
- Don’t Give Your Customers a Reason To Leave - August 22, 2018
