|
<< Click to Display Table of Contents >> Operator Module > Native agent app > Native agent app 7.X.X > Using the app > Chatting |
General
To have the ability to chat with your website visitors you need to login to the agent app.
There are two possible ways to start chatting:
•The visitor can call to your chat
•You can send a chat invitation to the visitor
In any case, a separate tab will be opened in the app for each chat conversation. You can switch between tabs to handle several chats concurrently. The latest chats will appear at the top.
There is no possibility to chat with several visitors in one chat room. But it is possible to invite several operators to the chat room.
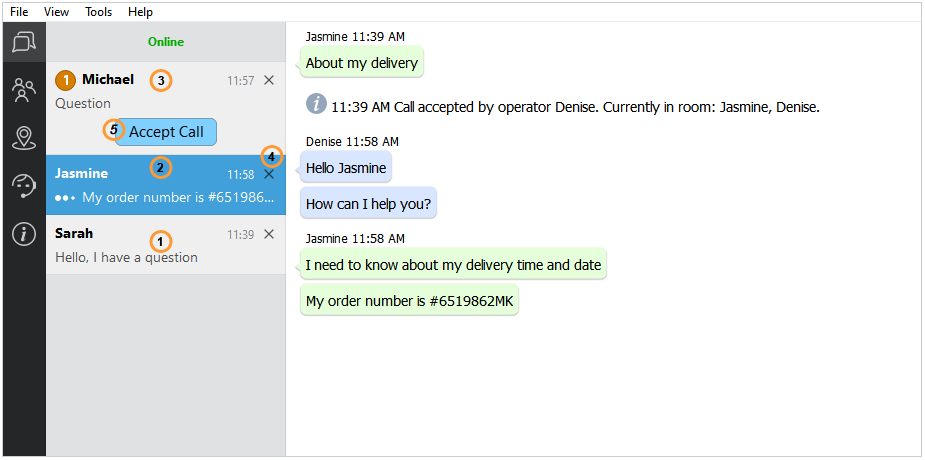
Tabs 1 and 2 on the image below are accepted chats.
Tab 2 is the active chat as this tab is open currently. You can see the chat history of this chat in the console and send messages to the visitor until you switch to another tab.
The chat on tab 3 is not accepted yet - the tab still contains Accept Call (5) button. You need to press Accept Call button to start chatting with the visitor. The chat also gets accepted automatically after you start typing a message ad send it to a customer. However, to avoid confusion if you use 'To All' call distribution method it is better accept the chat prior to typing and sending a message.
Managing chats

Chats in the native agent app
To accept incoming chat call, please press Accept Call (5) button on the chat tab. The chat also gets accepted automatically after you start typing a message and send it to a customer.
It is also possible to activate Chat calls auto accept option on the Tools / Options / Chat Rooms tab, if this is permitted by the account administrator.
When you wish to finish the chat, please click X (4) button on the chat tab.
Sometimes it is necessary to ignore or decline chat calls. To do this please click X (4) button on the chat tab without pressing Accept Call (5) button.
Messaging
Exchanging text messages in real time is the major feature of any live chat system. Messaging in our agent app is very simple and similar to messaging in any instant messenger.
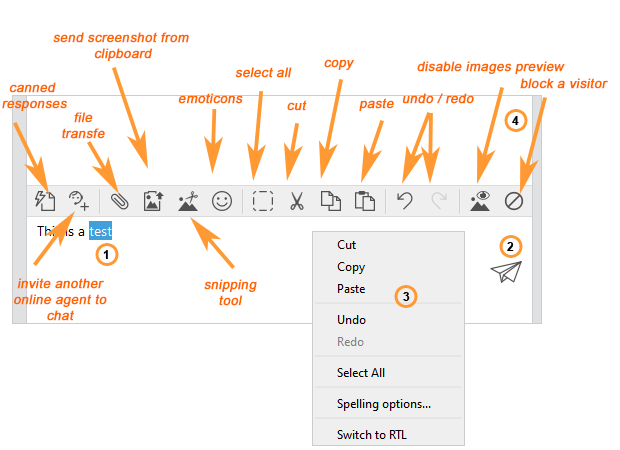
To send a message to the visitor, please type the message in the text input area and click Send (2) button or press Enter.
You can add line breaks to your message by pressing Ctrl+Enter.

1.Text input area - you can type your messages to the visitor in this area. HTML formatting is not supported in messages, but URLs and emails will become clickable after sending the message.
2.Send button (replaced with Invite when sending a proactive chat invitation) - you need to press this button to send a message to the visitor. You can also do this by pressing Enter on your keyboard.
3.Text input area context menu - this menu is opened by right click on the text input area. It contains basic editing functions (Cut, Copy and Paste, Select All), a call to spell checker options and a call to switch between Left-to-Right and Right-to-Left modes.
4.Additional features toolbar - this toolbar contains basic editing buttons (Cut, Copy, Paste, Undo, Redo) and a set of buttons to activate special features: canned responses, emoticons, file transfer
Deleting messages
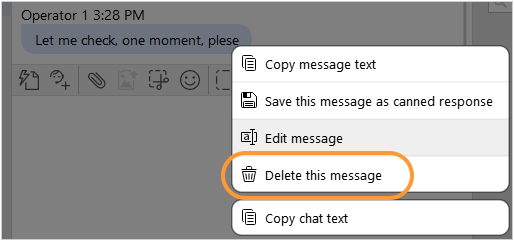
To remove a message you sent in chat, please do the following:
1.Right click on the message you would like to delete
2.Select "Delete this message" from the context menu

How to remove a message sent in chat
3.Confirm message deleting
Editing messages
Three latest messages of an agent can be edited in the agent app. To edit a messages, please do the following:
1.Right click on a message you would like to edit
2.Select "Edit message" option

Editing agent message
3.Update the message and press "Enter"
How to invite a visitor to chat
To invite a visitor to chat you need to do the following:
1.Select a visitor in the Visitors list
2.Click "Proactive Chat" button in the toolbar or right click on a visitor and select "Proactive Chat" from the drop down list

Sending proactive chat invitation
3.In the appeared room type a greeting message
4.Press "Send" button
Please note! Chat invitation sending is not automated in our system. Proactive chat invitations can be sent manually from the agent app.
How to invite another agent to chat
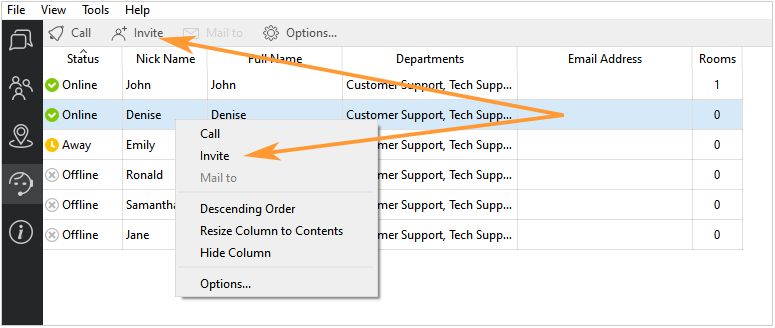
There are two ways to invite another agent to chat:
1.You can do this directly from the app toolbar by clicking "invite agent icon" ![]() and selecting the agent you would like to invite:
and selecting the agent you would like to invite:

Invite an agent to chat directly from the app toolbar
2.You can follow Team tab in the app, select an agent there and invite:

Invite an agent to chat from Team tab
How to send a screenshot from clipboard
To paste a screenshot from clipboard, please do the following:
1.Make a screenshot
2.Copy it
3.Click "Send screenshot from clipboard" icon in your operator console
4.Send it to your visitor
How to make a screenshot
The operator console allows making screenshots and send them directly in chat:
1.Click snipping tool icon 
2.Take a screenshot
3.Paste it to your chat
Basic editing
You can perform basic text editing actions when typing messages in the console.
Please use appropriate icons in the additional features toolbar or items in the context menu to cut, copy and paste text, undo and redo changes, select all text.
You can also use standard Windows shortcuts:
•Ctrl+C - copy
•Ctrl+X - cut
•Ctrl+V - paste
•Ctrl+A - select all
•Ctrl+Z - undo
•Ctrl+Y - redo
Emoticons
To insert an emoticon in chat, please do the following:
1.Click "Emoticon" icon ![]() in the toolbar
in the toolbar
2.Select the emoticon you would like to insert to chat
Emoticons in the agent app
You can also type a certain character string that will be automatically converted to emoticon directly in the text input area. You can find character strings for each emoticon at the bottom of the emoticons list.
Emoticons can be disabled by using special key /nosmile. It should be placed before the message. E.g. /nosmile test :)
In case you would like to disable and to show emoticons within one message, you can use /smile key for enabling them
/nosmile and /smile keys are system keys and do not appear after sending a message. Smileys are enabled by default, thus /smile key should be used only in combination with /nosmile if you decided to disable smileys in a part of your message.
/nosmile and /smile can be used in canned responses and /nosmile is recommended to be placed before HTML if it is sent in chat to prevent from converting symbols to emoticons.
Number of concurrent chats
You can have as many chats concurrently as you can handle, we don't limit this. But if you are overloaded by chats, you can switch the console to Away mode in order not to receive new chat calls but be able to continue all current chats.