|
<< Click to Display Table of Contents >> System Setup and Customization > Control Panel > Account customization > Managing canned responses |
General
Canned responses are messages used by agents to provide answers to commonly asked questions.
In our system canned responses can be managed from the account Control Panel only.
Both native and browser apps support canned responses, they can be inserted to a message or sent right away at any moment during an active chat session.
How to add / edit / delete canned responses
You can add / edit / delete canned responses in the account Control Panel, Canned Responses page.

Canned Responses page
Add
To add a new canned response, please do the following:
1.Click Create "+" link in a particular table (company, department or operator canned responses)
2.Specify the response title
3.Enter the response text
4.Press "Create" button
Edit
To edit a canned response, please do the following:
1.Click  link next to the particular canned response
2.Perform all needed changes
3.Press "Save" button
Delete
To delete a canned response, please do the following:
1.Put a checkmark next to the canned response you would like to delete
2.Click 'Delete selected' button
3.Confirm deleting the response

Delete canned response confirmation
Delete canned responses in bulk
If you would like to remove several canned responses, please do the following:
1.Choose the responses from the list by putting checkmarks in checkboxes next to them (1) or by using 'Select all' options
2.Press "Delete selected" (2) button

Removing several canned responses at a time
3.Confirm responses deleting:

Canned responses deleting confirmation
Grouping
Canned responses can be created on three levels:
•company level - canned responses are available to all agents in all departments
•department level - canned responses are available to all agents assigned to the particular department
•operator level - canned responses are available to a particular agent
Canned responses titles cannot be duplicated within a group (company level, departments level or operators level). In case you try creating a canned response with the same title you will receive the following warning:

Canned response duplicate warning
Managing custom groups
There is also a possibility to create additional custom groups for canned responses. In order to create groups you need to use the following syntax for the canned responses' titles:
[group/subgroup/sub-subgroup/....]Canned Response Title
Example: [General Questions/Contacts]Where are you located?
Both native and browser apps support custom grouping:

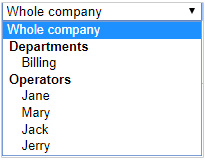
How canned responses groups are displayed in operator consoles (the stand-alone one on the left and the web-based one on the right)
Sorting
There are two special options for reordering canned responses in our system.
1.They can be moved up and down with help of special green arrows.

How to reorder canned responses
2.It is possible to drag and drop responses:
a.Position your mouse cursor over the response you'd like to drag:

b.Left click the response and drag it to a new position
c.Release your mouse cursor when you drag the response to a new position
Formatting
For large canned responses (up to 64000 characters is possible) you will need to add some formatting, e.g. some line breaks. This is possible in our system but with some limitations:
•When you create a response with line breaks and save it, it is displayed as a single line on the Canned Responses page but the formatting is still there. Thus when you add a response to your chat from the agent app, all line breaks are displayed properly:

Line breaks are not visible in the Control Panel but visible in the Operator Console
Reassigning canned responses
If you delete your agent profile or department, you can reassign their canned responses to a different agent, department or to the whole company. When you remove your agent or department, our system checks if there are canned responses created for that agent or department and offers you to reassign them:

How to reassign canned responses
In the drop down list you can choose a department or agent. You can also assign them to the whole company. In this case they will be available to all your agents and departments:
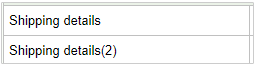
When you reassign your responses and our system detects duplicated titles, then these titles will contain numbers, like shown on the example below:
Limitations
•Canned responses do not support HTML formatting, but support URLs and emails.
•Canned responses do not support variables like OPERATOR, VISITOR etc.
Canned Responses Export to CSV
It is possible to export canned responses to a CSV file. To proceed with export click  link. The following form for export will appear:

Canned responses export form
You can either export all responses or choose the responses for specific agents or departments:

Choosing responses to export
As a field delimiter a comma (,) is used. You can open exported file with any editor that reads CSV files, e.g. Google Sheets, LibreOffice Calculator or MS Excel. Please note! If you use MS Excel as your editor for opening your canned responses CSV file, it will not display properly line breaks if they were used in your canned responses.
Canned Responses Import from CSV
It is possible to import your canned responses from a CSV file. To start importing you'd need to click the following button: 
Please note!
1.If you import from a CSV file, you'd need to use available template and keep the structure of your CSV file intact. Otherwise you will receive errors while importing your responses
2.Encoding of the CSV file should be Unicode or UTF-8
3.As a field delimiter, a comma (,) is used. If you want to add comma as punctuation to the text then use quotation marks. E.g. Hello "," how can I help you?
4.The columns 'Title', 'Owner type' and 'Text' are required. The column 'Owner name' is required only if you import canned responses that should be assigned to a specific agent or department
5.The title of your response should be unique within the group of your responses
After clicking 'Create multiple canned responses from a spreadsheet' button you will be redirected to the following page:

Canned responses import
To import your responses, please do the following:
•Download the template of the CSV file by clicking 'sample spreadsheet' (1) link
•Open the downloaded template in an editor, e.g. MS Excel or Google Sheets and add your data to the fields. The file has the following structure:

Canned responses CSV file structure
1.'Title' - this is the title of your response, the field is required. It should be unique within the group of your responses. You can group your responses by using square brackets and slashes. Titles should be unique within the same Owner type and/or the same group of your responses. E.g.: response "How can I help you?" in the sub-group "Welcome" of the group "Greetings" [Greetings/Welcome]How can I help you?
2.'Owner type' - in this field you should specify if you would like your canned responses to appear only for specific operator, department or the whole company. This field is required. It should contain one of the following values: company, department or operator.
3.'Owner name' - in this column you'd need to add the name of your department or nick name of your operator if you would like to assign those responses to specific operator or department (operator or department were defined in the owner type column). If you leave this field blank, responses will be assigned to the whole company (owner type 'company' was selected).
4.'Text' - this field is required, you should add the text of your response here. Line breaks can be applied. URLs and emails are formatted automatically to be clickable.
•After you have created the CSV file with your canned responses, click 'Choose file' (2) button to upload it. Here is an example of CSV file structure:

Example of CSV file structure
•To proceed with creating responses click 'Create' (3) button
•The system will check the file structure for errors while importing
•After your responses have been successfully imported, you will get the following confirmation:

Canned responses import confirmation
Possible errors
•Department/Operator [Department/Operator Name] does not exist
This error occurs if the operators and departments structure in the account does not match the one in the file you are importing. Before you start your import, please ensure that your operators and departments match the ones in the file you are planning to import

Department is missing
•Canned response with title [Title Name] already exists
This error appears if you already have responses with the same titles as in the file you are importing

Canned response already exists
•Incorrect CSV file
You will get this error if the structure of your CSV file is incorrect. Please ensure that you use a comma as your CSV file fields delimiter

Incorrect CSV file
How to transfer canned responses from one account to another
To transfer canned responses from one account to another, please follow the instruction:
1.Export canned responses from your account
2.Load exported CSV file in a CSV editor

CSV editor settings
3.Ensure that operators and departments structure matches the one of the account where you will import your canned responses to. Otherwise you will receive error messages and your canned responses will not be imported
4.Import the edited CSV file to another account of yours.